How To Touch Type – Six Top Tips
Touch typing is all about enabling you to type without looking at the keys. If you practice regularly your fingers will learn their location on the keyboard through muscle memory.
It will take time and practice to learn this skill master new letters, build your confidence and accuracy. In time you will increase your speed along the way. Just remember that it will take time and that every beginner learns at a different pace. It often takes a handful of sessions to feel comfortable with touch typing. That’s because it is the typing technique, not accuracy or speed, that you must learn first, and this requires developing new muscle memory.
1. Posture
Posture is incredibly important and there are two reasons why you should sit properly at the computer.
- It ensures adequate blood flow to the fingers and facilitating correct positioning of the hands
- Avoid injury, such as Carpal Tunnel Syndrome which causes a dull aching pain or numbness in the wrist, lower arm or hand but it can be avoided by keeping the elbows bent at a 90-degree angle and the wrists loose, with hands lightly resting on the keyboard
Here are our suggestions on how to sit:
- Sit straight and remember to keep your back straight
- Keep your elbows bent at the right angle
- Face the screen with your head slightly tilted forward
- Keep at least 45 – 70 cm of distance between your eyes and the screen
- Your wrists can touch the tabletop in front of the keyboard, although ideally you will use a wrist rest
2. Home Row Position
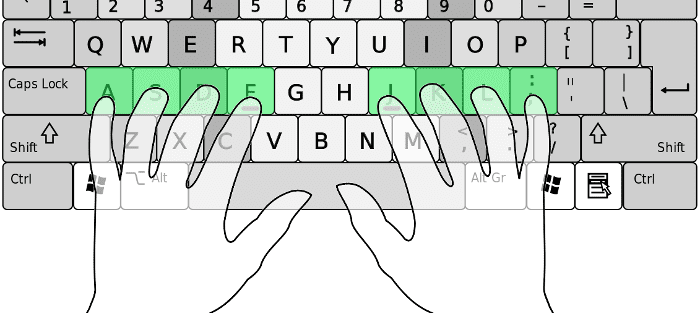
Curve your fingers a little and put them on the ASDF and JKL; keys which are located in the middle row of the letter keys. This row is called HOME ROW because you always start from these keys and always return to them.
Fand J keys under your index fingers should have a raised line on them to aide in finding these keys without looking.
3. Finger motion
Don’t look at the keys when you type. Just slide your fingers around until they find the home row marking.
Limit your hand and finger movement only to what is necessary to press a specific key. Keep your hands and fingers close to the base position. This improves typing speed and reduces stress on the hands.
Pay attention to ring fingers and little fingers, since they are considerably underdeveloped.
4. Typing speed
- Do not rush when you just started learning. Speed up only when your fingers hit the right keys out of habit
- Take your time when typing to avoid mistakes. The speed will pick up as you progress
- Always scan the text a word or two in advance
5. Keep practice lessons short and sweet
An ideal lesson for a beginner should be no shorter than 20 minutes and no longer than an hour.
Typing is all about repetition, automising your finger movements, so short and frequent practice is most effective.
- Practice every day or several times a week, training your hands, gradually developing muscle memory in your fingers
- Take plenty of breaks to move around, stretch and focus your eyes away from the screen
6. Learn from your mistakes
When you are first learning how to type, accuracy is not important as you learn to master the technique. What can help is setting up a camera on your hands, recording while you are typing, that way you can watch your movements and if mistakes occur can learn from them.
What can you look forward to?
Once you’ve mastered the skill of typing, you’ll notice that your accuracy increases and you spend less time reaching for the delete key.
If you’re using a program like Touch-type Read and Spell to learn, you can even pull graphs that chart your progress.
As you become a veteran typist, you’ll also get faster. You’ll also notice improvements in the quality of your writing as your ideas begin to flow freely through your fingertips and onto the screen.


Comments are closed.